Projects
Introduction
For a full reference of the Project API, please see the Python API.
A signac project is a conceptual entity consisting of three components:
- a data space,
- scripts and routines that operate on that space, and
- the project’s documentation.
This division corresponds largely to the definition of a computational project outlined by Wilson et al. The primary function of signac is to provide a single interface between component (2), the scripts encapsulating the project logic, and component (1), the underlying data generated and manipulated by these operations. By maintaining a clearly defined data space that can be easily indexed, signac can provide a consistent, homogeneous data access mechanism. In the process, signac’s maintainance of the data space also effectively functions as an implicit part of component (3), the project’s documentation.
Project Initialization
In order to use signac to manage a project’s data, the project must be initialized as a signac project. After a project has been initialized in signac, all shell and Python scripts executed within or below the project’s root directory have access to signac’s central facility, the signac project interface. The project interface provides simple and consistent access to the project’s underlying data space. [1]
| [1] | You can access a project interface from other locations by explicitly specifying the root directory. |
To initialize a project, simply execute $ signac init <project-name> on the command line inside the desired project directory (create a new project directory if needed).
For example, to initialize a signac project named MyProject in a directory called my_project, execute:
$ mkdir my_project
$ cd my_project
$ signac init MyProject
You can alternatively initialize your project within Python with the init_project() function:
>>> project = signac.init_project('MyProject')
This will create a configuration file which contains the name of the project. The directory that contains this configuration file is the project’s root directory.
The Data Space
The project data space is stored in the workspace directory.
By default this is a sub-directory within the project’s root directory named workspace.
Once a project has been initialized, any data inserted into the data space will be stored within this directory.
This association is not permanent; a project can be reassociated with a new workspace at any time, and it may at times be beneficial to maintain multiple separate workspaces for a single project.
You can access your signac Project and the associated data space from within your project’s root directory or any subdirectory from the command line:
$ signac project
MyProject
Or with the get_project() function:
>>> import signac
>>> project = signac.get_project()
>>> print(project)
MyProject
Jobs
For a full reference of the Job API, please see the Python API.
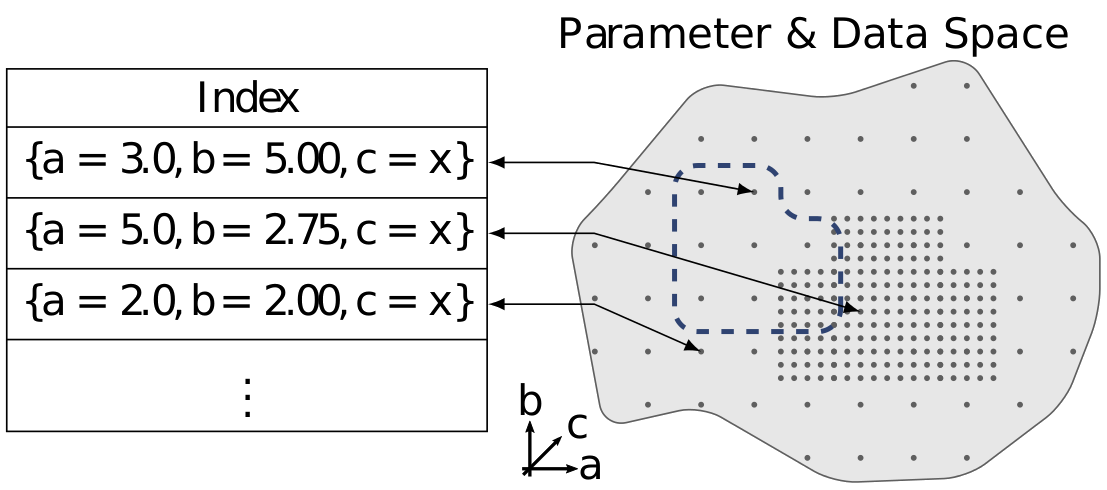
The central assumption of the signac data model is that the data space is divisible into individual data points, consisting of data and metadata, which are uniquely addressable in some manner. In the context of signac, each data point is called a job, and its unique address is referred to as a state point. A job can consist of any type of data, ranging from a single value to multiple terabytes of simulation data; signac’s only requirement is that this data can be encoded in a file.
State Points
A state point is a simple mapping of key-value pairs containing metadata describing the job. The state point is then used to compute a hash value, called the job id, which serves as the unique id for the job. The signac framework keeps track of all data and metadata by associating each job with a workspace directory, which is just a subdirectory of the project workspace. This subdirectory is named by the job id, therefore guaranteeing a unique file system path for each job within the project’s workspace directory.
Note
Because signac assumes that the state point is a unique identifier, multiple jobs cannot share the same state point. A typical remedy for scenarios where, e.g., multiple replicas are required, is to append the replica number to the state point to generate a unique state point.
Both the state point and the job id are equivalent addresses for jobs in the data space.
To access or modify a data point, obtain an instance of Job by passing the associated metadata as a mapping of key-value pairs (for example, as an instance of dict) into the open_job() method.
# Define a state point:
>>> statepoint = {'a': 0}
# Get the associated job:
>>> job = project.open_job(statepoint)
>>> print(job.get_id())
9bfd29df07674bc4aa960cf661b5acd2
In general an instance of Job only gives you a handle to a python object.
To create the underlying workspace directory and thus make the job part of the data space, you must initialize it.
You can initialize a job explicitly, by calling the init() method, or implictly, by either accessing the job’s job document or by switching into the job’s workspace directory.
>>> job = project.open_job({'a': 2})
# Job does not exist yet
>>> job in project
False
>>> job.init()
# Job now exists
>>> job in project
True
Once a job has been initialized, it may also be opened by id as follows (initialization is required because prior to initialization the job id has not yet been calculated):
>>> job.init()
>>> job2 = project.open_job(id=job.get_id())
>>> job == job2
True
Whether a job is opened by state point or job id, an instance of Job can always be used to retrieve the associated state point, the job id, and the workspace directory with the statepoint(), get_id(), and workspace() methods, respectively:
>>> print(job.statepoint())
{'a': 0}
>>> print(job.get_id())
9bfd29df07674bc4aa960cf661b5acd2
>>> print(job.workspace())
'/home/johndoe/my_project/workspace/9bfd29df07674bc4aa960cf661b5acd2'
Evidently, the job’s workspace directory is a subdirectory of the project’s workspace and is named by the job’s id.
We can use the signac.Job.fn() convenience function to prepend the this workspace path to a file name; job.fn(filename) is equivalent to os.path.join(job.workspace(), filename).
This function makes it easy to create or open files which are associated with the job:
>>> print(job.fn('newfile.txt'))
'/home/johndoe/my_project/workspace/9bfd29df07674bc4aa960cf661b5acd2/newfile.txt'
For convenience, the state point may also be accessed via the statepoint or sp attributes, e.g., the value for a can be printed using either print(job.sp.a) or print(job.statepoint.a).
This also works for nested state points: print(job.sp.b.c)!
An additional advantage of accessing the statepoint via the attributes is that these can be directly modified, triggering a recalculation of the job id and a renaming of the job’s workspace directory.
Modifying the State Point
As just mentioned, the state point of a job can be changed after initialization. A typical example where this may be necessary, is to add previously not needed state point keys. Modifying a state point entails modifying the job id which means that the state point file needs to be rewritten and the job’s workspace directory is renamed, both of which are computationally cheap operations. The user is nevertheless advised to take great care when modifying a job’s state point since errors may render the data space inconsistent.
There are three main options for modifying a job’s state point:
- Directly via the job’s
statepointandspattributes,- via the job’s
update_statepoint()method, and- via the job’s
reset_statepoint()method.
The update_statepoint() method provides safeguards against accidental overwriting of existing state point values, while reset_statepoint() will simply reset the whole state point without further questions.
The statepoint and sp attributes provide the greatest flexibility, but similar to reset_statepoint() they provide no additional protection.
Important
Regardless of method, signac will always raise a DestinationExistsError if a state point modification would result in the overwriting of an existing job.
The following examples demonstrate how to add, rename and delete state point keys using the sp attribute:
To add a new key b to all existing state points that do not currently contain this key, execute:
for job in project:
    job.sp.setdefault('b', 0)
Renaming a state point key from b to c:
for job in project:
    assert 'c' not in job.sp
    job.sp.c = job.statepoint.pop('b')
To remove a state point key c:
for job in project:
    if 'c' in job.sp:
        del job.sp['c']
You can modify nested state points in-place, but you will need to use dictionaries to add new nested keys, e.g.:
>>> job.statepoint()
{'a': 0}
>>> job.sp.b.c = 0  # <-- will raise an AttributeError!!

# Instead:
>>> job.sp.b = {'c': 0}

# Now you can modify in-place:
>>> job.sp.b.c = 1
The Job Document
In addition to the state point, additional metadata can be associated with your job in the form of simple key-value pairs using the job document.
This job document is automatically stored in the job’s workspace directory in JSON format.
You can access it via the document or the doc attribute.
>>> job = project.open_job(statepoint)
>>> job.doc['hello'] = 'world'
# or equivalently
>>> job.doc.hello = 'world'
Just like the job state point, individual keys may be accessed either as attributes or through a functional interface, e.g.. The following examples are all equivalent:
>>> print(job.document().get('hello'))
world
>>> print(job.document.hello)
world
>>> print(job.doc.hello)
world
Tip
Use the Job.document.get() method to return None or another specified default value for missing values. This works exactly like with python’s built-in dictionaries.
Use cases for the job document include, but are not limited to:
- storage of lightweight data,
- Tracking of runtime information
- labeling of jobs, e.g. to identify error states.
Finding jobs
In general, you can iterate over all initialized jobs using the following idiom:
for job in project:
    pass
This notation is shorthand for the following snippet of code using the find_jobs() method:
for job in project.find_jobs():
    pass
However, the find_jobs() interface is much more powerful in that it allows filtering for subsets of jobs.
For example, to iterate over all jobs that have a state point parameter b=0, execute:
for job in project.find_jobs({'b': 0}):
    pass
For more information on how to search for specific jobs in Python and on the command line, please see the Query API chapter.
Grouping
Grouping operations can be performed on the complete project data space or the results of search queries, enabling aggregated analysis of multiple jobs and state points.
The return value of the signac.Project.find_jobs() method is an iterator over all jobs (or all jobs matching an optional filter if one is specified).
This iterator is an instance of JobsCursor and allows us to group these jobs by state point parameters, the job document values, or even arbitrary functions.
Note
The groupby() method is very similar to Python’s built-in itertools.groupby() function.
Basic Grouping by Key
Grouping can be quickly performed using a statepoint or job document key.
If a was a state point variable in a project’s parameter space, we can quickly enumerate the groups corresponding to each value of a like this:
for a, group in project.groupby('a'):
    print(a, list(group))
Similarly, we can group by values in the job document as well. Here, we group all jobs in the project by a job document key b:
for b, group in project.groupbydoc('b'):
    print(b, list(group))
Grouping by Multiple Keys
Grouping by multiple state point parameters or job document values is possible, by passing an iterable of fields that should be used for grouping. For example, we can group jobs by state point parameters c and d:
for (c, d), group in project.groupby(('c', 'd')):
    print(c, d, list(group))
Searching and Grouping
We can group a data subspace by combining a search with a group-by function. As an example, we can first select all jobs, where the state point key e is equal to 1 and then group them by the state point parameter f:
for f, group in project.find_jobs({'e': 1}).groupby('f'):
    print(f, list(group))
Custom Grouping Functions
We can group jobs by essentially arbitrary functions.
For this, we define a function that expects one argument and then pass it into the groupby() method.
Here is an example using an anonymous lambda function as the grouping function:
for (d, count), group in project.groupby(lambda job: (job.sp['d'], job.document['count'])):
    print(d, count, list(group))
Moving, Copying and Removal
In some cases it may desirable to divide or merge a project data space.
To move a job to a different project, use the move() method:
other_project = get_project(root='/path/to/other_project')

for job in jobs_to_move:
    job.move(other_project)
Copy a job from a different project with the clone() method:
project = get_project()

for job in jobs_to_copy:
    project.clone(job)
Trying to move or copy a job to a project which has already an initialized job with the same state point, will trigger a DestinationExistsError.
Warning
While moving is a cheap renaming operation, copying may be much more expensive since all of the job’s data will be copied from one workspace into the other.
To clear all data associated with a specific job, call the clear() method.
Note that this function will do nothing if the job is uninitialized; the reset() method will also clear all data associated with a job, but it will also automatically initialize the job if it was not originally initialized.
To permanently delete a job and its contents use the remove() method:
job = project.open_job(statepoint)
job.remove()
assert job not in project
Centralized Project Data
To support the centralization of project-level data, signac offers simple facilities for placing data at the project level instead of associating it with a specific job. For one, signac provides a project document analogous to the job document. The project document is stored in JSON format in the project root directory and can be used to store similar types of data to the job document.
>>> project = signac.get_project()
>>> project.doc['hello'] = 'world'
>>> print(project.doc().get('hello'))
'world'
>>> print(project.doc.hello)
'world'
In addition, signac also provides the signac.Project.fn() method, which is analogous to the signac.Job.fn() method described above:
>>> print(project.root_directory())
'/home/johndoe/my_project/'
>>> print(project.fn('foo.bar'))
'/home/johndoe/my_project/foo.bar'
Schema Detection
While signac does not require you to specify an explicit state point schema, it is always possible to deduce an implicit semi-structured schema from a project’s data space. This schema is comprised of the set of all keys present in all state points, as well as the range of values that these keys are associated with.
Assuming that we initialize our data space with two state point keys, a and b, where a is associated with some set of numbers and b contains a boolean value:
for a in range(3):
    for b in (True, False):
        project.open_job({'a': a, 'b': b}).init()
Then we can use the signac.Project.detect_schema() method to get a basic summary of keys within the project’s data space and their respective range:
>>> print(project.detect_schema())
{
 'a': 'int([0, 1, 2], 3)',
 'b': 'bool([False, True], 2)',
}
This functionality is also available directly from the command line:
$ signac schema
{
 'a': 'int([0, 1, 2], 3)',
 'b': 'bool([False, True], 2)',
}
Importing and Exporting Data
Data archival is important to preserving the integrity, utility, and shareability of a project. To this end, signac provides interfaces for importing workspaces from and exporting workspaces to directories, zip-files, and tarballs. The exported project archives are useful for publishing data, e.g., for researchers wishing to make an original data set available alongside a publication.
Exporting a Workspace
Exporting a project could be as simple as zipping the project files and workspace paths ($ zip -r project_archive.zip /data/my_project/).
The functionality provided by signac export is a bit more fine-grained and allows the use of a custom path structure or the export of a subset of the jobs based on state point or document filters or by job id.
For example, suppose we have a project stored locally in the path /data/my_project and want to export it to a directory /data/my_project_archive.
The project’s jobs are assumed to have state point keys a and b with integer values.
We would first change into the root directory of the project that we want to export and then call signac export with the target path:
$ cd /data/my_project
$ signac export /data/my_project_archive
This would copy data from the source project to the export directory with the following directory structure:
/data/my_project_archive/a/0/b/0/
/data/my_project_archive/a/0/b/1/
/data/my_project_archive/a/0/b/2/
# etc.
The default path function is based on the implicit schema of all exported jobs, but we can also optionally specify a specific export path, for example like this:
$ signac export /data/my_project_archive "a_{a}/b_{b}"
It is possible to directly export to a zip-file or tarball by simply providing the path to the archive-file as target (e.g. $ signac export /data/my_project_archive.zip).
For more details on how to use signac export, type $ signac export --help or see the documentation for the export_to() method.
Importing a Data Space
The import of data spaces into a signac workspace means to map all directories as part of an arbitrary directory structure to signac job state points. That is easiest when one imports a previously exported workspace, which will still contain all state point files.
For example, we could first export our workspace in ~/my_project to ~/data/ with
~/my_project $ signac export ~/data/
and then import the exported data into a second project:
~/my_new_project $ signac import ~/data/
Since the imported data space was previously exported with signac, all state point metadata is automatically determined from the state point manifest files.
In the case that we want to import a data space that was not previously exported with signac, we need to provide a schema-function. In the simplest case, that is just a function based on the data space paths, e.g.,
$ signac import /data/non_signac_archive "a_{a:int}/b_{b:int}"
The command above will copy all data from the the /data/non_signac_archive directory and use the paths of sub-directories to identify the associated state points.
For example, the path a_0/b_1 will be interpreted as {'a': 0, 'b': 1}.
The type specification – here int for both a and b – is optional and means that these values are converted to type int; the default type is str.
Importing from zip-files and tarballs works similarly, by specifying that path as the origin.
For more details on how to use signac import, type $ signac import --help or see the documentation for import_from().
Linked Views
Data space organization by job id is both efficient and flexible, but the obfuscation introduced by the job id makes inspecting the workspace on the command line or via a file browser much harder. A linked view is a directory hierarchy with human-interpretable names that link to to the actual job workspace directories. Unlike the default mode for data export, no data is copied for the generation of linked views.
To create views from the command line use the $ signac view command.
Important
When the project data space is changed by adding or removing jobs, simply update the view, by executing create_linked_view() or signac view for the same view directory again.
You can limit the linked view to a specific data subset by providing a set of job ids to the create_linked_view() method.
This works similar for $ signac view on the command line, but here you can also specify a filter directly:
$ signac view -f a 0
will create a linked view for all jobs, where a=0.
Synchronization
In some cases it may be necessary to store a project at more than one location, perhaps for backup purposes or for remote execution of data space operations. In this case there will be a regular need to synchronize these data spaces.
Synchronization of two projects can be accomplished by either using rsync to directly synchronize the respective workspace directories, or by using signac sync, a tool designed for more fine-grained synchronization of project data spaces.
Users who are familiar with rsync will recognize that most of the core functionality and API of rsync is replicated in signac sync.
As an example, let’s assume that we have a project stored locally in the path /data/my_project and want to synchronize it with /remote/my_project.
We would first change into the root directory of the project that we want to synchronize data into.
Then we would call signac sync with the path of the project that we want to synchronize with:
$ cd /data/my_project
$ signac sync /remote/my_project
This would copy data from the remote project to the local project.
For more details on how to use signac sync, type $ signac sync --help.
Projects can also be synchronized using the Python API:
project.sync('/remote/my_project')